The SkyQ Project has one simple aim: to set up a one-touch channel changer for someone living with dementia. Their speed and dexterity have declined to the point where even typing a three-digit Sky channel number quickly enough has become a real challenge, and we needed a practical way to help.
If you have already read through the equipment that you need, your Raspberry Pi (or equivalent device) should already be set up with Home Assistant installed and ready to go. What we need to do now is get the specific options and integrations in place so we can start building the automations.
These are the posts I would recommend reading first before carrying on. They cover what I had to do to fulfil my own use case, including keeping remote access available to monitor and tweak things, and making sure my end user could not accidentally break anything:
- The equipment that you need – if you have not already read this
If you are controlling things remotely:
- How to Set Up and Configure TailScale
If you are putting controls in the SkyQ user’s home:
- How to set up Additional Users
- Kiosk Mode – preventing inadvertent changes
There are many great add-ons and custom integrations out there, built by hobbyists, tech enthusiasts and sometimes even the original developers. If this is your first time installing integrations on Home Assistant, I would strongly recommend doing it through a web browser on a computer. The Android app is perfectly usable once you are up and running, but the screens can be a little fiddly when you are configuring things for the first time.
VERY IMPORTANT NOTE: You may have already guessed that I do not live at the same house where this project is installed. Throughout this guide I will make references to being on the same network as the Sky Box, Home Assistant and the router. If you are setting this up for someone else, it is worth noting that a lot of this is far simpler to do while you are physically at their home.
Integration – Preparing Sky Remote Control
For this project I chose the Sky Remote Control integration, which comes included as part of the Home Assistant core integration list. The reason for this choice is straightforward: the interaction between the user (in my case, my relative with dementia) and the system needed to be as simple as possible, without any unnecessary complexity. This integration is designed to control both the SkyQ and Sky+ HD box, and it works independently of the physical remote you already have, so you can happily continue using both.
Before we load the integration, the first task is to find or set the IP address of the Sky box. You will need to access your router’s DHCP settings, and I would recommend reserving a specific IP address for the Sky box while you are in there. This means that even if the router is ever rebooted, the Sky box will always pick up the same address and your automations will carry on working without any intervention needed.
In our situation, the relative had a SkyQ subscription but no Sky Broadband, so we went with a mobile broadband router as the best fit for the setup. I do not have a SkyQ router to hand to show the exact steps for reserving an IP address, but this post on the Sky Forums gives a good pointer to where you need to look in the router settings. There is an ‘Add’ box under the Address Reservation section which is what you are after.
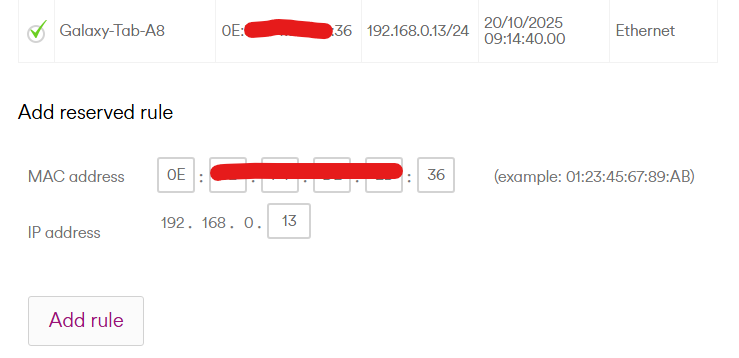
Using my Virgin Media router as an example, it is simply a case of copying the MAC address (or selecting it from the list and letting it fill in automatically) and then assigning an IP address. I tend to pick a higher number that is easy to remember. In this setup I used 192.168.0.189 for the SkyQ box and 192.168.0.199 for a tablet that was going to remain permanently on the local network.
While you are in the router settings, it is also worth reserving an IP address for your Home Assistant device (your Raspberry Pi, for example) to keep everything consistently reachable.
Important Note: If you plan to access the system from outside the network, for example changing a channel remotely from your own device or PC, there is no need to reserve an IP address for that device. It is only the devices inside the local network (the Sky box, Raspberry Pi and any in-home tablets) that need reserved addresses.
Integration – Installing Sky Remote Control
The easiest way to install the integration is to visit the Home Assistant website page for Sky Remote Control. Even if you plan to install it directly from within Home Assistant at /config/integrations/dashboard, the website page is still worth keeping open as it provides a lot of useful detail on which features you can control and how to configure the commands further down the line.

Click the blue Add Integration to My Home Assistant button and a pop-up will appear asking you to confirm the IP address of your Home Assistant instance.
If clicking Open Link does not load the page successfully, enter your Home Assistant’s reserved IP address followed by the port number :8123 into the Your Instance URL field.
Your web browser should then open Home Assistant and walk you through two prompts: first confirming that you want to install the integration, then asking you to enter the IP address of the Sky box. That is the address you reserved or noted down a moment ago.
If everything has gone smoothly, the Sky Remote Control integration should now be visible in your Home Assistant integrations dashboard at [your HA IP]:8123/config/integrations/dashboard. Feel free to have a look inside the integration menu, though there is not a great deal to see just yet.
1 thought on “The SkyQ Project – From Home Assistant to SkyQ Assistant”