Around three weeks after doing anything, I have usually forgotten it ever happened. I have no idea why the last five years have turned me into such a forgetful wreck, but I am going to blame an abundance of free time during the COVID lockdowns and the rather impressive quantities of mind-numbing alcohol that accompanied them.
(… and honestly, who could blame me — that first summer practically demanded you sit in the garden with a glass full of ice and a bottle of single malt…)
A Use-Case — The Brita Water Filter
Either way, I needed a reliable way to keep track of the important dates and recurring tasks around the house. Take our Brita water filters as an example. When we bought the jug and the kettle, the replaceable filters were advertised as lasting around 30 days, and the small digital displays and LEDs are built with that in mind.
When Brita released their updated Pro range — the Pro (Hard Water) and Pro (Limescale Expert) filters — the lifespan jumped to 60 days. There is absolutely no chance I would remember whether I changed the filter 30 days ago, let alone 60.
So I turned to my Home Assistant build on the Raspberry Pi to put together a simple system for this and other recurring tasks. As a bonus, I also have a spare tablet that could be set up specifically for the job — although, as you might expect, the Good Lady Wife has made her feelings very clear: “We don’t need more bl**dy screens around the house.” Mostly because she does not want reminders about changing the bedding.
The Baked-In Solutions
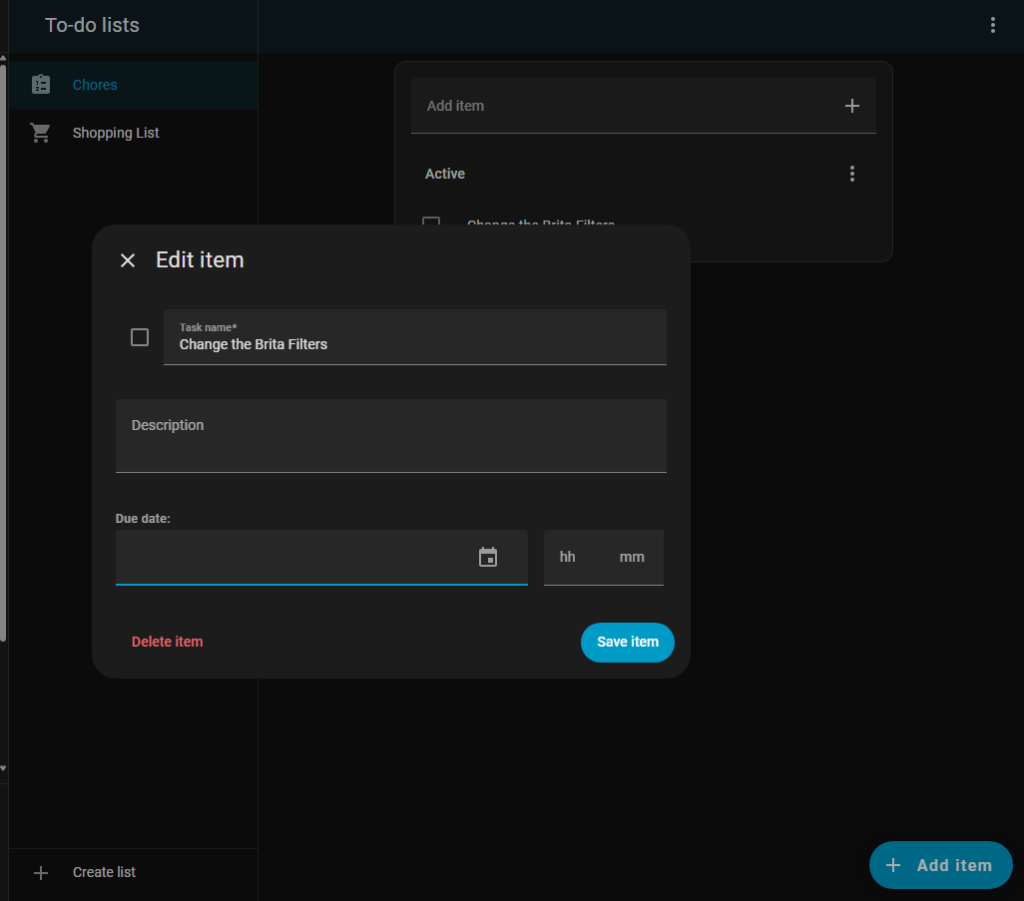
It is worth mentioning that Home Assistant does already have some tools for this built in.
There is a built-in To-do system where you can manually add items, set due dates, and work through them. It does the job, but it gets fiddly quickly — and once you are managing multiple lists, it becomes more of a chore than the chores themselves.
Besides, I wanted to experiment.
The 3rd Party Integrations
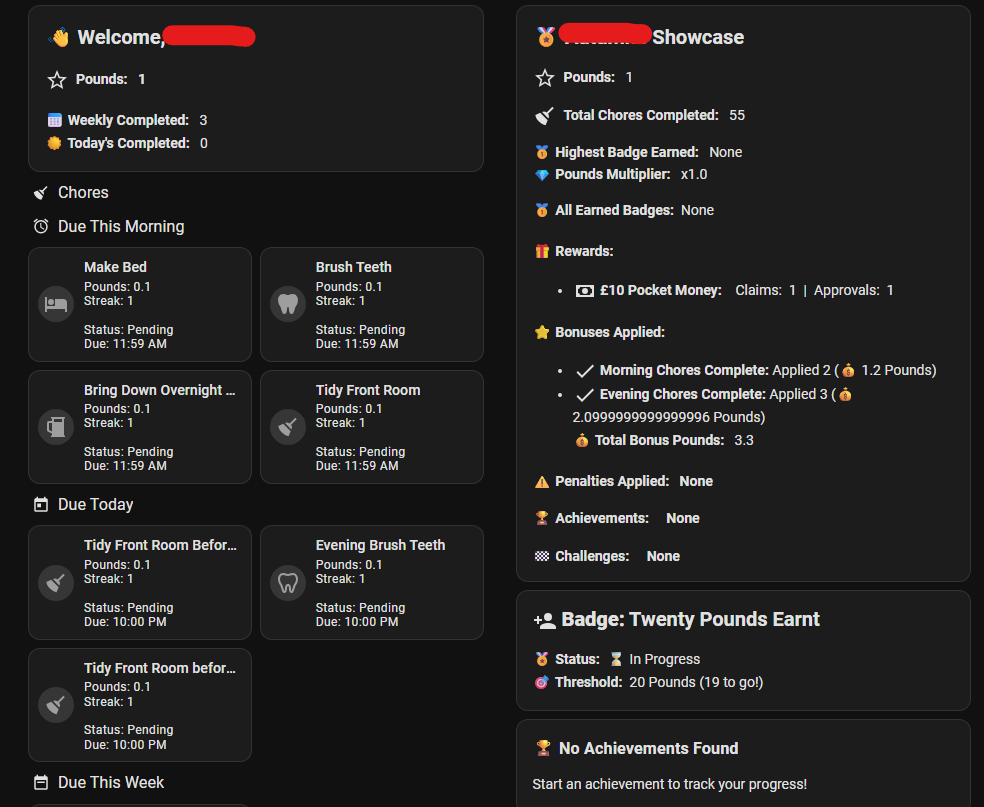
For the children, I use the Kids Chores integration for Home Assistant. The idea is that they earn pocket money for completing basic tasks — funding sweets, holiday spending money, and perhaps the occasional bottle of Scotch for their father.
Okay, not the Scotch.
As you can see from the screenshot, the children have not yet embraced the system with any great enthusiasm. They could each earn up to £15 a week for doing basic things, but getting them to five completed tasks remains an ongoing ambition.
The dashboard section shown is actually part of the integration’s core setup — a testament to how much detail the author put into it.
But I Wanted to Experiment
I also did not want to muddle the Kids Chores setup with adult tasks — and I am certainly not paying the spouse pocket money. She can earn her own.
So I set about building a simple system for managing adult household tasks: something that shows what has been done, what is coming up, and makes it genuinely easy to use.
The Task List for the Task List
Before building anything, I mapped out what I actually needed. We use touch screens around the house, so accidental triggers were a real concern — I did not want the Brita filter going weeks longer than it should because someone brushed the screen. With that in mind, I wanted the system to cover three things:
- A confirmation step after marking a task complete, so an accidental tap can be undone
- A clearly visible due date on each task
- A background log of when tasks were completed
The Elements I Used
The solution uses a small set of Home Assistant Helpers. For each task — using the Brita filter as the example — I created:
- A button input for Brita filter in /config/helpers to drive the dashboard button
- A datetime input for Brita filter in /config/helpers to store the next due date
- A script for the Brita filter in /config/script/dashboard to handle the logic
- A button on the dashboard to trigger it all
Setting up the button and datetime helper is straightforward. I configured the datetime helper to include the time as well as the date, though in practice the time component turned out to be unnecessary.
The Script
The main thing to decide before writing the script is the interval between tasks. Once that is settled, duplicating the script for additional tasks is simply a case of copying it and updating the helper names. For those new to Home Assistant, scripts can be built using the visual interface or written directly in YAML. I went with YAML:
alias: Brita Filter Change
sequence:
  - target:
      entity_id: input_datetime.brita_filter_change
    data:
      datetime: "{{ (now() + timedelta(days=60)).strftime('%Y-%m-%d %H:%M') }}"
    action: input_datetime.set_datetime
  - data:
      title: Brita Filter Changed
      message: >-
        Brita Filters due next: {{ (now() + timedelta(days=60)).strftime('%B %d,
        %Y') }}
      notification_id: brita_filter_change
    action: persistent_notification.create
description: Date & Time management for Brita Filter Changing
Breaking it down:
- The script targets the datetime input and sets the next due date to 60 days from now, formatted in the way Home Assistant expects (Year-Month-Day Hour:Minute)
- It then creates a persistent notification in Home Assistant — or pushes one to the app on Android or iOS — confirming the task has been completed
If you ever want to verify when a task was last completed, the built-in logbook at /logbook keeps a full record.
The Button
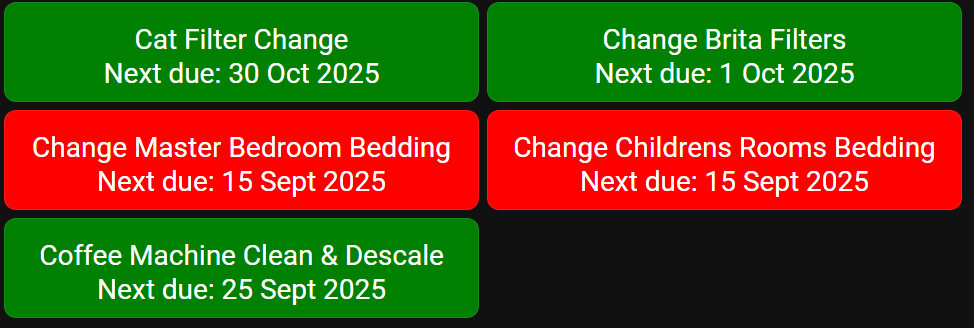
The dashboard button goes a step further than just triggering the script. Each button is colour-coded based on the task status:
- Green when the task is not yet due
- Yellow on the day it is due
- Red when it is overdue
- Grey if the status is unknown
The text colour also adjusts for contrast — black on yellow, white on green and red.
type: custom:button-card
entity: input_button.brita_filter_change
name: Brita Filter Change
icon: mdi:water
show_state: false
tap_action:
  action: call-service
  service: script.brita_filter_change_2
  confirmation:
    text: Has the Brita Filter been Changed?
styles:
  card:
    - height: 100px
    - background-color: |
        [[[
          const nextDue = states['input_datetime.brita_filter_change'].state;
          if (!nextDue) return 'grey'; // fallback color
          const dueDate = new Date(nextDue);
          const today = new Date();
          today.setHours(0,0,0,0);
          dueDate.setHours(0,0,0,0);

          if (dueDate < today) {
            return 'red'; // overdue
          } else if (dueDate.getTime() === today.getTime()) {
            return 'yellow'; // due today
          } else {
            return 'green'; //due in future
          }
        ]]]
    - font-size: 28px
    - color: |
        [[[
          const nextDue = states['input_datetime.brita_filter_change'].state;
          if (!nextDue) return 'white';
          const dueDate = new Date(nextDue);
          const today = new Date();
          today.setHours(0,0,0,0);
          dueDate.setHours(0,0,0,0);
          return dueDate < today ? 'white' : dueDate.getTime() === today.getTime() ? 'black' : 'white';
        ]]]
  icon:
    - color: |
        [[[
          const nextDue = states['input_datetime.brita_filter_change'].state;
          const dueDate = new Date(nextDue);
          const today = new Date();
          return dueDate <= today ? 'red' : 'green';
        ]]]
label: |
  [[[
    const nextDue = states['input_datetime.brita_filter_change'].state;
    if (!nextDue) return "Next due: Unknown";
    const dueDate = new Date(nextDue);
    // Format as DD MMM YYYY
    return "Next due: " + dueDate.toLocaleDateString('en-GB', { year: 'numeric', month: 'short', day: 'numeric' });
  ]]]
show_label: true
Pressing the button triggers the script and shows a confirmation prompt. Once confirmed, the datetime helper updates automatically and the button reflects the new due date and colour straight away.
You can of course adjust the variables to suit your setup. For a low vision user, a font size of 28 with two buttons per row sits comfortably on a 10-inch tablet — in this case an old Samsung Tab A6 from 2016 that has found a new purpose.
As you can probably tell from the screenshot, it is well past time I sorted the bedding.
1 thought on “A Simple Task List for Adults”