My Tech Home sometimes uses Affiliate Links where the blog author sometimes receives a commission.
Onboarding – The Initial Install
The Pi is built, plugged in and powered on. The first boot takes longer than any subsequent one — the operating system is unpacking itself and configuring to your specific hardware and network. This is entirely normal. Community posts from a year or two back mentioned extended first boots. If yours seems to be taking a while, do not pull the power cable out. Just wait.
Go and get that coffee. Or something considerably stronger if it has been that kind of day.
Before we install any of the actual Sky Q integrations, there are two things to do first:
- Complete the initial onboarding of Home Assistant
- Install HACS — the Home Assistant Community Store
Accessing Home Assistant
On any device connected to the same network, open a browser and try:
homeassistant:8123 or homeassistant.local:8123 — and if neither of those work, use the static IP address you assigned to the Pi followed by :8123.
On both my Virgin Media router and the TP-Link mobile router on this project, the hostname approach worked first time without any fuss. Home Assistant advertises itself to the local network by that name, and most modern residential routers support enough mDNS to make that work transparently.
I am not a networking expert — and I am entirely happy to be corrected on the finer details of that.
On-boarding
The initial setup is a short series of questions followed by the creation of an admin account. Use this account for administration only — it has access to everything in the system without restriction, and if you are building this for someone with an enthusiastic approach to pressing buttons without reading what they say first, that distinction matters quite a lot.
Home Assistant have a clear guide to this process on their website. Use a strong password for the admin account. Once everything is up and running, you can create additional restricted user accounts for anyone who needs access to the dashboard but absolutely does not need access to the settings page.
Installing Home Assistant Community Store
HACS is one of the best things about Home Assistant as a platform. The community has built integrations that make genuinely complicated things manageable, and HACS is how you access all of them. Install it now and it will save you considerable effort later.
The process is two steps: install the add-on, then activate it. Both are simple.
Step one — navigate to the add-on store. The quickest route, once Home Assistant is running, is directly to http://homeassistant:8123/hassio/store, or from the menus at Settings > Add-ons. You are looking for the add-on repository called Get HACS. Install it, start it, and go straight to the Log tab.
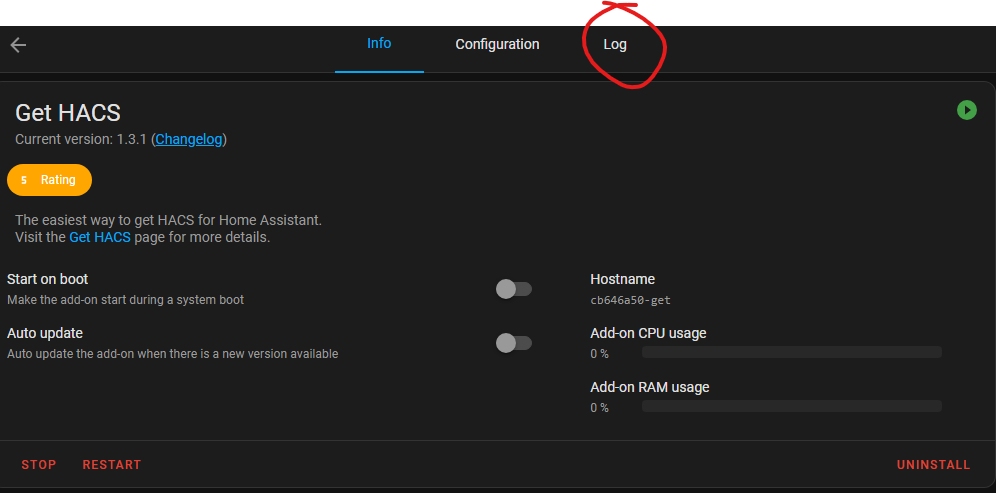
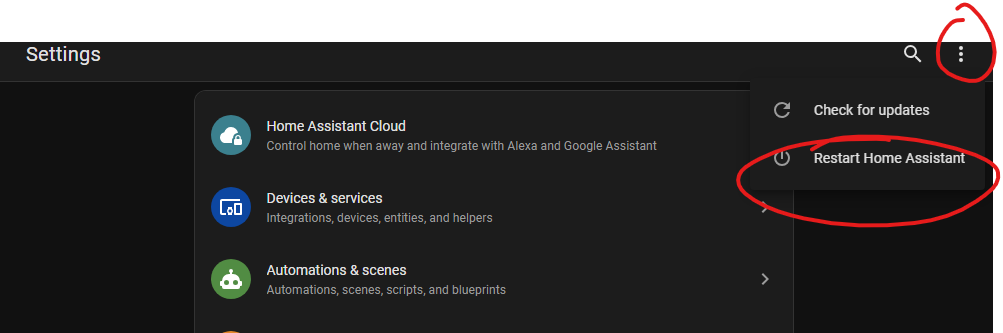
In the Log tab, wait for the process to complete. When it tells you — clearly, in the log — to “Remember to restart Home Assistant before you configure it“, that is your cue. Restart Home Assistant from the overflow menu (the three dots) on the Settings page.
Right. Now We Can Begin.
That is the groundwork done. Home Assistant is installed, onboarded and extended with HACS — and we have not written a single line of automation yet. Everything that follows in the Sky Q build sits directly on top of exactly this foundation, and having done it properly now will save a significant amount of backtracking later.
I have kept this on a dedicated Raspberry Pi running the full Home Assistant OS, for the simple reason that it is the easiest platform to manage and maintain long-term. If you have taken a different route — Docker, a mini PC, WSL — the Home Assistant community forums are extensive and well-indexed, and very few problems turn out to be genuinely new ones. Good luck.