My Tech Home sometimes uses Affiliate Links where the blog author sometimes receives a commission.
Onboarding – The Initial Install
So we have now built out Raspberry Pi, plugged it in and turned it on. This will take a few minutes to boot the first time around as the microSD card has all the code of the operating system unpacked and configured specifically to your hardware and network. It’s time to go get that fresh cup of coffee or can of beer.
Anecdotal evidence from community forums a year or two ago said that their first boot took longer. If it does… do not worry.
In this section we are going to do two things before installing the actual integrations:
- Onboarding the Home Assistant
- Install HACS (Home Assistant Community Store)
Accessing Home Assistant
The first way I would suggest trying to access Home Assistant, while connected on the same network, is simply to open a web-browser and use the web address:
homeassistant:8123 or homeassistant.local:8123 – if this does not work then use the static IP of the Raspberry Pi followed by :8123
Certainly on my Virgin Media router at home, and the TP-Link mobile router I set the SkyQ project up on, it this worked. The Home Assistant will be advertising itself to your local network by that name and most residential routers now support at least basic mDNS in a way that it will allow you to do this.
I am not a networking expert, so happy to be corrected.
On-boarding
The initial setup of your Home Assistant operating system should be just answering a few simple questions and setting up an admin account. It is important that this admin account is used only for setting up and managing the Home Assistant system as it has access to everything. If you are setting up a system for someone who is prone to pressing buttons just because they are there….
Fortunately Home Assistant have a very simple guide on their website.
Remember that you should set-up your admin account with a strong password. Once you start setting everything up, you will be able to set up additional users with restrictions to what they can do.
Installing Home Assistant Community Store
The HACS is great. Home Assistant is as much as community as it is a system and contributions from the community have made some of the most complicated system easier to manage.
To do this takes two parts; installing the add-on and activating it. Both are really simple.
Firstly you need to prompt your system to install an add-on. If you have your Home Assistant set-up and logged in then you can probably just use the url http://homeassistant:8123/hassio/store or on the menus navigate to Settings > Add-ons.
You are looking for the HACS Add-on Repository called Get HACS, install, then start. Your next place to go is the Log tab.
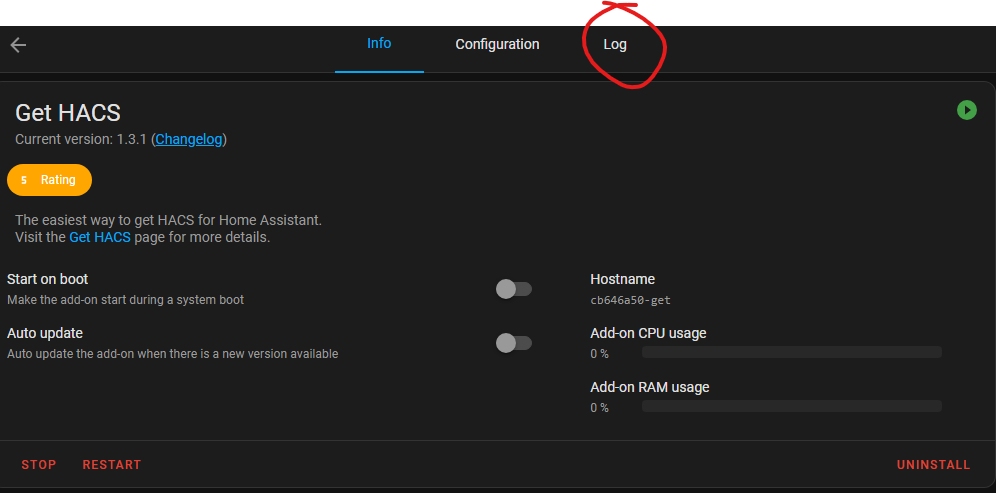
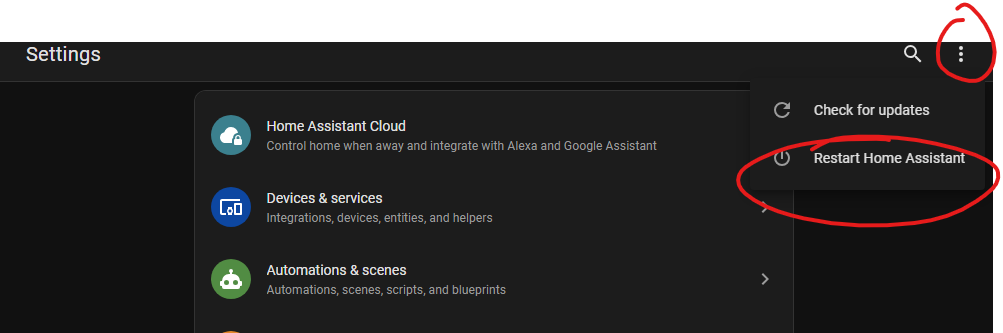
You are looking in the Log tab for it to load and do some configuration before it says “Remember to restart Home Assistant before you configure it“, which is your cue to – restart the Home Assistant. This is found in the overflow menu (the three dots) in the Settings page.
We Are Now Ready to Begin
Now I have given you the first steps of installing the Home Assistant and getting it ready to expand. I know, if you are reading this in the early days of this site it is probably still saying “the SkyQ Project” but it is a very simple overview of how to get started with any Home Assistant project.
I have deliberately set my project up on a dedicated Raspberry Pi running the Home Assistant OS to make it as easy to manage as possible. Of course, if you have installed in another way then good luck.
2 thoughts on “My Home Assistant Project – Equipment & Software”